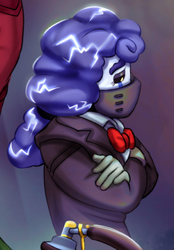
Official art of the Rainmaker from the Hires & Heroes key art
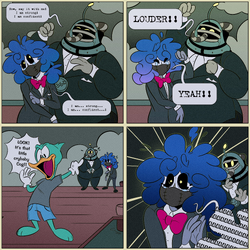
Art of Rainmaker from an official Twitter comic.
A photo of the Rainmaker and the Derrick Man from the cogs.ink treasure trove
The Rainmaker is a Lawbot Manager Boss who was introduced as part of the Hires & Heroes Update. She can be fought at the end of the pier beyond The Lighthouse on Lighthouse Lane in Barnacle Boatyard after unlocking the Kudos Task A Misty Mystery. She was first revealed during the cogs.ink ARG.
Toons fighting against the Rainmaker will have Content Sync applied to them. They will be synced down to the following stats:
| Rainmaker Attacks | ||||
|---|---|---|---|---|
| Brain Storm
(Single) |
Liquidate
(Single) |
Power Trip
(All) |
Freeze Assets
(Single) | |
| Damage | 10 | 12 | 8 | 10 |
| Accuracy | 80 | 65 | 70 | 75 |
| Frequency | 30 | 25 | 20 | 25 |

This battle has a soft cap of up to four Cogs (with exceptions during Monsoon, seen below). Different Weather Phases grant different Cog capacities. Storm Cell provides 3 additional Cogs, while Fog, Heavy Rain, and Oil Rain have up to 2 additional Cogs. These Cogs can be from any department with a Level range of 5-9, except during Monsoon in which levels can reach to 14. There is an increased chance of these Cogs being Lawbots (about 55%).

The Rainmaker has a maximum Lure Resistance of 1 round. Once she drops down to 1 HP, this resistance will turn into Lure Immunity.

The Rainmaker will start off the fight with one extra attack per turn. The amount of extra attacks she has will increase by one each time her Inversion cheat triggers.

The Rainmaker will change the current weather phase at random. She starts off with a "normal" weather phase at the beginning of the fight, which lasts for 1 round. Afterwards any subsequent phases last for 2 rounds before cycling to another. Each weather phase and its effects are listed below.

The Rainmaker's hair will turn into a darker color, whilst making the rest of the screen a similar tone. During this phase, all Toons will take 8 damage per round and All Cogs will heal 50 HP per round. This can cause Cogs to become Overcharged.

The Rainmaker's hair will turn gray, and will cover the screen entirely with fog, obscuring view of both the Toons and the Cogs. During this phase, Toons will be unable to view any information on any of the Cogs in the fight, showing only question marks in place of their names, levels, and HP.

The Rainmaker's hair will turn to a darker blue, and will tint the arena blue as heavy rain falls from the sky. During this phase, damage will be increased to all Toons and Cogs by 20%, however 50% of the damage will be delayed until the next weather transition, at which point it will all be dealt in burst. The damage is rounded up after being increased by 20%, and when it is split, the remainder goes into the initial damage. For example, a 41 damage hit after the 20% boost will split into 21 for the initial hit and 20 will be stored. Toons can view how much damage both themselves and the Cogs will take by hovering over the icon for Heavy Rain's Status Effect.

The Rainmaker's hair will become brighter, and have significantly more lightning bolts in it. After 2 rounds, she will unleash a lightning bolt attack that will deal maximum of 36 damage onto every Toon. Such damage can be decreased for every attack that hits her, -4 damage per Gag.

After every 3 weather cycles or if Monsoon has ended, the Rainmaker's hair will change back to its original state and the weather will turn back to normal. This cheat will grant the Rainmaker one extra attack to use per round.

Once the Rainmaker drops below 780 HP (or 30% of her max HP), she will summon a tornado behind the Toons, picking them up and bringing them to platforms made of clouds. They cannot use Toon-Up or Sound Gags, but will retain perfect accuracy across all other Gags. This weather phase will last for two rounds and all Cogs will not attack any Toons during this time. At the beginning of this phase, the Rainmaker will gain the Monsoon status effect, which reduces the amount of damage she takes by 90% for 3 rounds, and will spawn in 4 new Cogs, all replacing any previous Cogs that were present before the weather change. Cogs summoned range from Level 9 to Level 14 and have a Lure Resistance of 1 round. Each one will have a randomly given status effect. The kind of status effects that can be given include:

If the Rainmaker is dealt with lethal damage, her health bar will immediately stop at 1 HP. She will stop the current weather cycle and sends any remaining Cogs away, not allowing them (including herself) to attack. It is at this point that Toons can either attack her or "spare" her (not using Gags for the duration of 3 rounds). Aside from a special cutscenes for sparing her, there are no major differences from doing either. During this time, Gags can still miss if used, and will begin the unique cutscene as if none were used. As soon as she is damaged, whether one of the cutscenes has played or not, she will fly away.
| Recommended Gags | |||
|---|---|---|---|
| Track | "Should I bring this Gag to this fight?" | "Should I Prestige it?" | "How many Toons should bring it?" |
 Toon-Up |
Important for keeping you and your teammates alive. The Rainmaker and the other Cogs are capable of doing a lot of damage, especially in Storm Cell and Heavy Rain. While you could rely on Unites and Prestige Throw for healing, they may not be enough when things go south and your team is backed into a dangerous situation. Rating: 3/3 Stars |
The improved self-heal can lower the need for additional Toon-Up Gags and Unites over the course of the battle. At the same time, base Toon-Up can usually do well on its own, especially if multiple Toons have it. The extra round of Cheer helps with the consistency of Lure + Throw, Lure + Trap + other Gags, and Squirt/Throw and Drop turns against the Rainmaker. Rating: 2/3 Stars |
2-4 Toons |
 Trap |
Trap will mostly be used for its utility in this fight and chip damage to the Rainmaker. It gives increased accuracy to Lure when placed down which could immediately be followed up by Drop if desired, and gives increased accuracy to Lure + Throw and Squirt/Throw + Drop on the subsequent turn through the Dazed effect.
Rating: 2/3 Stars |
Trap will almost always be placed directly on the Rainmaker, making the slight damage boost against her from the Prestige insubstantial. If there are Cogs that need to be taken out, it's usually better to Zap them and the Rainmaker, or use Sound if feasible, than to use Trap.
Rating: 1/3 Stars |
1-2 Toons |
 Lure |
Greatly effective and important here for its ability to stall the Cogs for multiple turns, thus making it safer for the Rainmaker to be focused down with single target combos such as Lure + 3 Throw and Throw + 3 Drop (after also applying Soaked or Dazed, or getting Cheer for the extra accuracy). Rating: 3/3 Stars |
Great for extra damage to the Rainmaker, specifically in Lure + 3 Throw turns. Rating: 3/3 Stars
|
2-3 Toons |
 Throw |
A very strong and very important main damage dealer to the Rainmaker when combined with Lure, and is a good additional boon to Drop's damage due to the Marked effect. You will want both Throw and Drop for single target damage output. Having both means having a higher stock of single target damage options, meaning a higher overall damage potential as well. The former is safer as Lure + Throw relies on only one accuracy roll for the full damage, and if the Throw is Prestige, can also provide some self-heal on top of that. Rating: 3/3 Stars |
As usual for Manager battles, Throw's Prestige is very useful for this fight, allowing you to deal reliable damage while having to spend less of other resources on healing. This self-healing could especially prove useful during Oil Rain, Heavy Rain, and Storm Cell. It can stave off some of the Rainmaker's damage, thus allowing your team to commit more Gags to attacking her. Rating: 3/3 Stars |
4 Toons
|
 Squirt |
Important for the general uses of the Soaked debuff as well as enabling Zap, which will likely be used multiple times during this fight. The Soaked debuff can increase the accuracy of Lure + Throw and Throw + Drop for several rounds. Rating: 3/3 Stars |
The Prestige does very little if anything at all for this fight. It is very rare for the increased Splash Damage to enable any new kills on Cogs when paired with Zap. Rating: 0/3 Stars |
2-4 Toons |
 Zap |
Very useful for being an effective way to deal damage to Rainmaker and neighboring Cogs deemed as threats simultaneously, and to deal with the Cogs in the Monsoon phase. Rating: 3/3 Stars |
Useful for letting Zap take out higher health Cogs deemed as threats and damaging the Rainmaker simultaneously. Possibly, the Prestige can also save having to use some TVs that would be reserved for the Monsoon phase. Rating: 2/3 Stars |
3-4 Toons |
 Sound |
Decent for clearing multiple low-mid health threatening Cogs right before they unlure and finishing off the remaining Cogs on the first turn after Monsoon.
Rating: 2/3 Stars |
Allows for bigger burst damage turns or larger Laff recovery turns after using Sound, but the Prestige won't get much mileage as Sound itself won't be used that frequently throughout this battle. Other Prestiges like Drop, Throw and Lure are deemed more valuable in this battle because they are permanent boosts to their respective Gags, and those Gags will be used much more frequently here.
Rating: 2/3 Stars |
0 or 4 Toons |
 Drop |
A very strong and very important main damage dealer to the Rainmaker. Very potent when set up for better accuracy through things like the Soaked and Dazed effects and the innate +20% accuracy from previous Gags hitting the target on the same turn. You will want both Throw and Drop for single target damage output. Having both means having a higher stock of single target damage options, meaning higher overall damage potential as well. The latter is more dependent on setup with accuracy buffs such as Soaked and/or Dazed, but can have a higher payoff in overall damage.
Rating: 3/3 Stars |
Great for even more direct damage to the Rainmaker. Especially potent with the variety of debuffs that have opportunity to be applied to the Rainmaker (Soaked, Dazed, Marked) throughout the turns, and even the Encore buff.
Rating: 3/3 Stars |
4 Toons |
Overall, you'll want to play aggressively for the Rainmaker battle. This means prioritizing dealing direct damage to her whenever it's safe enough to and avoiding clearing the Cogs unless they are exceedingly dangerous or, in the case of Monsoon, you have virtually no choice to. Slower tactics like stalling out weather phases or using a lot of Toon-Up while slowly chipping away at the Rainmaker's health are unfavorable. She can gain an extra Attack to use after every 2 weather phases via Inversion, making her more dangerous the longer she's kept alive.
Keep in mind that Unites and IOUs are allowed in this battle. Using them is not mandatory for success, but they are very helpful here.
Phase 1 (Pre-Monsoon)
Your goal during this phase should be to get the Rainmaker below 810 HP as fast as possible to trigger Monsoon.
The Rainmaker will choose a random weather phase to enter after turn 1. Your strategy will vary based on what she chooses and what Cogs spawn, but generally:
At any point, if the Rainmaker has 1281 or less health, you can use a Prestige $10 Bill + 3 Fruit Pies to enter the Monsoon phase and force the current weather phase to end. Keep in mind that before she starts the Monsoon phase, no other Cogs will attack, but she will attack once, and then the current weather phase will be forced to end. This means that effects such as the damage from Oil Rain and the release of all stored damage from Heavy Rain will still occur.
Monsoon
Your goal during this phase should simply be to make sure as few Cogs survive as possible by turn 3 of Monsoon, and of the ones that may inevitably survive, that they can easily be finished off so that other Toons can do whatever they want to prepare to finish off the Rainmaker. The Cogs originating from this phase are unable to dodge gags, so be sure to use that to your advantage. There are only two possible Monsoon sets, so here are one of many consistent ways to deal with them:
Phase 2 (Post-Monsoon)
At this point, the Rainmaker should be pretty low health. She will have at least 3 attacks, most likely 4, but most of the time you will be able to end the fight before she gains any more than that.
The only weather phase that naturally becomes more dangerous post-Monsoon is Heavy Rain, as Inversion will have caused the Rainmaker to have gained at least 1 extra attack. While rare, it is possible to die from full Laff if you get targeted heavily, so be sure to play a little more cautiously.

Rainmaker Sticker![]()

Storm Cloud Hat![]()

|

| Opening Cutscene | Toons walk to the pier's end, encountering the Rainmaker sitting there and singing to herself
"Ip dip dip, my blue ship, sails on the water..." The Rainmaker turns her head around to see the Toons "Oh, hi there. I was just spending some time by myself." The Toons get angry "I'm guessing you're not here to exchange pleasantries." The Rainmaker stands up and faces the Toons "I've done nothing wrong. I'm not sure why you want to fight me." |
|---|---|
| Ending Cutscene (Mercy) | The Rainmaker changes from her current weather state to Inversion
The Toons do nothing "I don't get it." The Toons do nothing "Oh, don't play dumb with me!" The Toons do nothing "I want to be friends with you Toons." The Rainmaker turns around and recalls a painful memory as the camera pans upward with the weather changing to Heavy Rain "But every time I try, you're mean to me!" The camera comes back down, the weather changes to Storm Cell "She tried to drop a piano on me!" The Rainmaker turns back around "Why did she do that?! There was no reason!" The Toons do nothing "It's really easy, from where you are, to judge me." The Rainmaker walks to the pier's end "I know you do. Bessie isn't the only one I talked to." The Rainmaker turns her head towards the Toons "But the shame of it is, you're not even the worst." The Rainmaker, now sitting on the pier again, as the weather changes to Oil Rain "Those other Suits have hurt me too." As she says this, the weather changes to Fog and the Rainmaker disappears |
| Ending Cutscene (Defeat) | (Triggered by dealing damage to her at any point during the final cutscene)
The Rainmaker changes from her current weather state to Inversion
The Toons attack "Fine then! If you're not going to show sympathy, then what's the point?!" The Rainmaker flies away |

| Oil Rain |
|
|---|---|
| Fog |
|
| Heavy Rain |
|
| Storm Cell |
|
| Inversion |
|
| Monsoon |
|

| Face-Off Taunts |
|
|---|---|
| Death Taunts |
|
| Surrender Taunt |
|
| Friend Request Denials |
|
| Friend Request Denials (Fog) |
|
| Attempt to Sue |
|
| Attempt to Fire |
|
| Theme | Audio File | Song Title |
|---|---|---|
| Pier Gate Theme | N/A | |
| Opening Cutscene Theme | Ip dip dip | |
| Battle Theme (Base) | Cold Front | |
| Battle Theme (Oil Rain) | Blackened Seas | |
| Battle Theme (Fog) | Dew Point | |
| Battle Theme (Heavy Rain) | Flash Flood | |
| Battle Theme (Storm Cell) | Sorrowful Storms | |
| Battle Theme (Monsoon) | Eye of the Storm | |
| Ending Cutscene Theme | Hope For Someday | |
| Victory Theme (Unused) | N/A |

| Statement | |
|---|---|
| Question | |
| Grunt | |
| Murmur | |
| Death (Unused) |

| Rain Ambience | |
|---|---|
| Oil Rain Ambience | |
| Fog Ambience | |
| Oil Rain/Inversion Heal | |
| Storm Cell/Heavy Rain Hit |
"While Rainmaker needed some adjustments in v1.4.0 to scale the fight properly with the introduction of Unites to her fight, it was a little overtuned. Our aim here is to bring the difficulty back down to the intended level, as well as remove some potentially unfair moments in the fight." -Corporate Clash Crew
monsoonmisty and her password is Calmbef0reThEm0nsOon.

Official art of the Rainmaker from the Hires & Heroes key art

Art of Rainmaker from an official Twitter comic.

A photo of the Rainmaker and the Derrick Man from the cogs.ink treasure trove

Sorrowful Sympathist

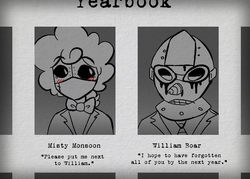
The Rainmaker's profile picture on cogs.ink

The in-game popup announcing the first Toons to defeat the Rainmaker

A reference image of the Rainmaker's model, created by Clash Crew Member Polygon

Rainmaker's hair textures on her first model by Clash Crew Member Candy

A Valentoon's Day card from the Rainmaker

The Rainmaker featured in a teaser for the 2023 Summer Update

The Rainmaker performing her Oil Rain cheat

The Rainmaker's appearance prior to v1.7.0

The Rainmaker during the intro cutscene


Toons flying away during Monsoon

The Toons in the sky during Monsoon

The Rainmaker fight during Fog

Lightning from Storm Cell hitting Toons and Cogs

The Rainmaker at the end of the fight if she is spared


Renders of the Rainmaker

Heavy Rain

Oil Rain

Storm Cell

Fog

The Rainmaker's Weather Phase animation

An unused death animation using the Rainmaker's old head model